Accurate modelling and up-to-date information with laser scanning

Detailed and accurate measurement material created with laser scanning is clear and unambiguous. Its correctness can be verified and any errors can be found afterwards without having to make new measurements. This is something that cannot be done with traditional measurement methods.
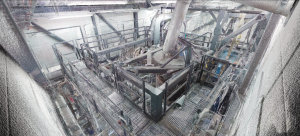
Laser scanning is an optical measuring method that is based on measuring the time it takes for emitted laser pulses to be reflected back from objects. A laser scanner records a series of distance observations that creates a three-dimensional point cloud.
Laser scanning can be useful if, for example, a customer wants to purchase new equipment to be placed in old facilities or move their old equipment to a new site. Many times there are no drawings to be found of old factories or they are no longer up to date. By scanning an object, such as a production machine or a space, design work can be started with an accurate and updated point cloud, rather than having to model objects with incomplete data.
It also provides solutions for situations where the equipment in use has already reached a significant age or products have been in production for so long that the specific product data is hard to find or missing completely. Laser scanning is the answer. Larger machinery or parts thereof can be easily scanned, and the results can be used as a basis for reverse engineering. The results can then be used to produce up-to-date drawings to facilitate further development. Thanks to point clouds and 3D software, the design process can be completed more quickly and efficiently.
Minimizing of errors a great asset
Manual measuring of complex shapes is laborious and sometimes quite impossible. It is also very slow and often results in errors. Laser scanning is an easy and safe method for the measurement of old factories, for example, when designing a new roof or when the building’s blueprints are missing. Double-arched and other surfaces that are difficult to measure otherwise pose no problem for laser scanning.
Laser scanning also offers a cost-efficient tool for verifying the dimensions of finished products or machinery. It allows users to quickly ensure, to the accuracy of a couple of millimeters, that the product has been manufactured in accordance with the drawings.
Scanning can also prevent production downtime, which may cause six-figure expenses.
– It’s much cheaper to scan and fix a broken machine on site than send it to the other end of the country for repair, says design engineer Teemu Mattila at Comatec.
Laser scanning saves plenty of time and money
The resource efficiency of laser scanning compared to manual measurements can be surprising. The method saves time, because to scan an object the size of a car, for example, and to clean up the point cloud and transfer all this to 3D software only takes a few hours. With traditional methods, this could easily take two to three days, and the results would never be as accurate.
To scan a small production facility, depending on the level of accuracy, takes a little over a day, plus a day or two to clean up the point cloud and to transfer the data. Using traditional methods, measuring a small production facility can take several months, and the data is not easy to transfer into 3D software.
 Laser scanning also saves money, because, using the car example above, the scanning and transfer of the cleaned point cloud to the customer’s 3D systems only costs approximately one tenth of what it would cost with a manual procedure.
Comatec is a reliable design partner for industry that provides laser scanning services for a wide range of industrial needs.
– Our service is particularly useful in production facilities where additional costs caused by measurement errors are a source of frustration. We provide measurement agility, accuracy and proven savings, says Juho Majuri, Department Manager at Comatec.


